Chocolate Raspberry Icebox Cake
Looking for an easy, but impressive Valentine's Day dessert your sweetheart will love? Look no further! This Chocolate Raspberry Icebox Cake is made with chocolate wafers layered between homemade raspberry whipped cream.

What is an Icebox Cake?
Icebox cakes have been around for ages. They are essentially wafers layered with cream that can also feature fruit or nuts. The cake is not baked, but instead is refrigerated for 12-24 hours to allow it to set. After that amount of time, the wafers absorb the liquid from the cream and becomes a soft, creamy dessert. They are a great thing to make with kids! Have them count out the wafer cookies for you, or let them help spread the whipped cream on top.

What You'll Need
There are just a few ingredients needed to make this Chocolate Raspberry Icebox Cake:
- Raspberries - 2 clamshell containers of fresh raspberries will yield about 2 cups. You could also use frozen. They are combined with sugar and water to create a sweet raspberry sauce
- Heavy cream - sweetened with powdered sugar to make the creamy whipped cream to combine with the raspberry sauce
- Chocolate wafer cookies - these are found in the packaged cookie aisle of the grocery store. The kind I buy are called "Famous Chocolate Wafers" and have yellow packaging.
- Optional garnishes:
- Freeze-dried raspberries - I chop them up and place them around the bottom of the cake and some on top. They add a bright splash of color to the cake.
- Shaved chocolate - take a good quality dark chocolate bar and cut thin shavings using a sharp knife. I always like to garnish things with what the recipe is made from. We eat with our eyes first so it gives people looking at the cake a good clue with what's inside.
- Fresh raspberries - add a few to the top of the cake for some more extra color. I just think they look pretty.

How to Make Raspberry Whipped Cream
This raspberry whipped cream has just the right amount of raspberry flavor and isn't overly sweet. It complements the chocolate wafers perfectly. To make the raspberry whipped cream, start with making a raspberry syrup that will be whipped into the cream.
In a saucepan combine raspberries, water & sugar. Using the back of a spoon, mash the raspberries until no big chunks remain. Bring to a simmer over medium heat and cook 10-15 minutes. The sauce will start to cook down and just begin to thicken. Strain the sauce through a fine mesh sieve. There are a lot of seeds that wouldn't give a good texture to the whipped cream, so it's important to strain the sauce. After straining you will end up with about 1 cup of raspberry sauce. Place the sauce in the fridge until completely cooled.
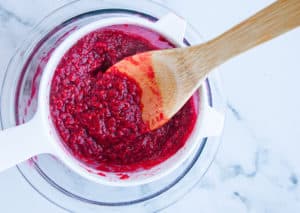
When making whipped cream, I like to place my metal mixing bowl and whisk in the fridge for about 15 minutes before starting. The key to good whipped cream to have everything really cold. When everything is chilled, place heavy cream in the mixing bowl and start whipping with either a stand or hand mixer. Gradually add powdered sugar to the cream. Continue to beat on high until the cream starts to stiffen then slowly pour in cooled raspberry sauce. Keep beating until the whipped cream is stiff. It's important for the whipped cream to hold it's shape so the cake doesn't become too mushy.
Assembling the Chocolate Raspberry Icebox Cake
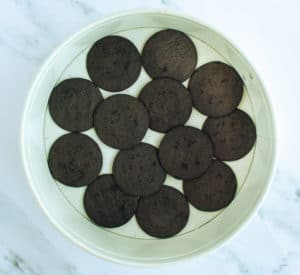
To assemble the icebox cake, spread out a layer of chocolate wafer cookies in the bottom of a 9 inch springform pan. Lay 9 cookies in a circle around the edges, overlapping just slightly. Then 4 cookies in the middle to cover up as much space as possible. I use more wafer cookies on this bottom layer to establish a good base for the cake.
Gently spread a layer of raspberry whipped cream over all the cookies, making sure to get right up to the edge. Doing this on the first layer is the hardest because the cookies like to move around, so use your fingers to hold the wafer cookies down as you spread out the whipped cream. You want a whipped cream layer that is about ¼ inch thick. Repeat with 3 more layers of 12 wafer cookies and raspberry whipped cream between each.

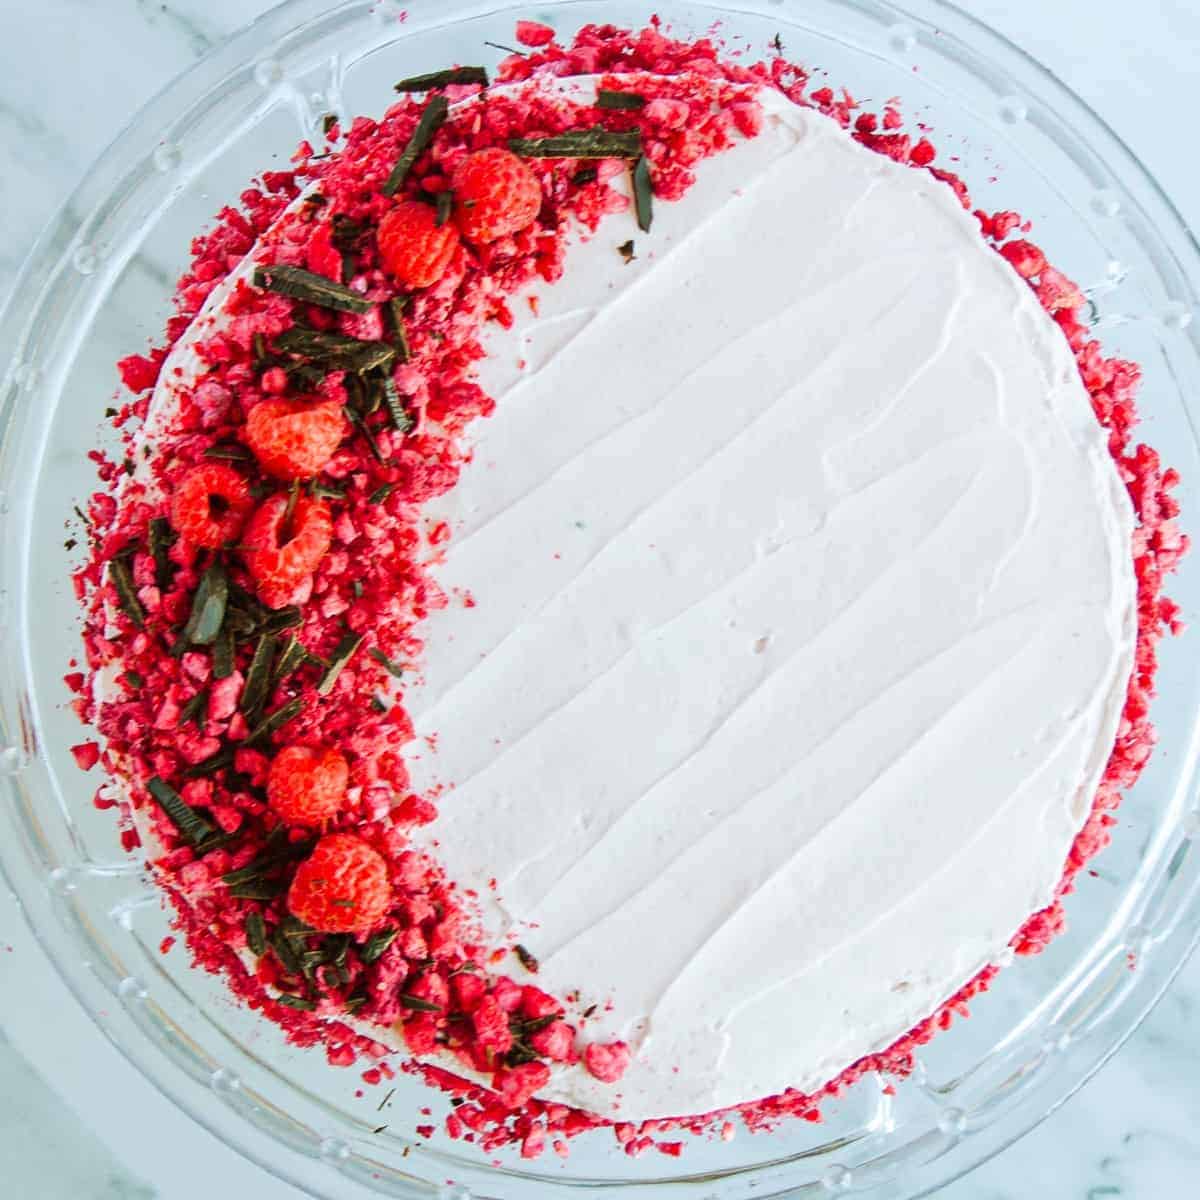
Frost the top of the cake with more raspberry whipped cream and reserve the remaining (about 1 cup) in the fridge for frosting the sides of the cake after it sets. Cover the cake with plastic wrap and refrigerate for anywhere between 12-24 hours. Everything will get nice & chilled and the wafer cookies will soak up the liquid from the whipped cream.
To remove the cake from the pan, first remove outer band of the springform pan. Use a thin spatula and run it underneath the bottom of the cake. Using 2 spatulas, carefully transfer the cake onto a serving tray. This part can be nerve-wracking! The cake is very fragile so just do your best. The best part is that any breakage or cracks that happen during the transfer can be covered up with more whipped cream. Whipped cream can fix anything, right?
Use the leftover raspberry whipped cream to frost the sides of the cake and garnish, if desired.

I've never been into huge, extravagant celebrations for Valentine's Day, but instead use it as another excuse to make something delicious for the people I love. Who am I kidding? I really don't need an excuse to do this, but I love using a theme that relates to these holidays and incorporate it into the colors and flavors of a dish. Whether you are spending a romantic evening alone with your sweetheart, or celebrating as a family, this Chocolate Raspberry Icebox Cake is something everyone will love!
Other date night dessert ideas:
📖 Recipe
Chocolate Raspberry Icebox Cake
Ingredients
Equipment
Method
- In a small saucepan heat raspberries, sugar & water over medium heat. Using the back of the spoon, mash the raspberries. Bring mixture to a simmer and cook 10-15 minutes until slightly thickened.
- Strain raspberry sauce through a fine mesh sieve. Chill sauce until cool.
- In a cold metal mixing bowl, start whipping heavy cream on high speed using a stand or hand mixer. Gradually add powdered sugar a tablespoon at a time. When the cream is starting to become stiff, slowly pour in cooled raspberry sauce. Continue beating until whipped cream is stiff.
- In a 9 inch springform pan, lay out 13 chocolate wafers on the bottom. Gently spread a layer of raspberry whipped cream over all the wafers about ¼ inch thick. Repeat this process with 3 more layers of 12 wafers and raspberry whipped cream between each.
- Cover top of cake with raspberry whipped cream. Reserve remaining whipped cream (about 1 cup) in a separate container and refrigerate until tomorrow. Cover cake with plastic wrap and refrigerate for 12 hours at a minimum, 24 hours is preferred.
- After 24 hours, remove cake from springform pan by first removing outer band and running a spatula underneath. Using 2 large spatulas, carefully transfer the cake onto a serving tray.
- Using the leftover whipped cream, frost the sides of the cake. Garnish with chopped freeze-dried raspberries, chocolate shavings & fresh raspberries.
Notes
- 2 cups of frozen raspberries would also work for this recipe
- I often place the raspberry syrup in the freezer for 15-20 minutes to speed up the cooling process.
- This cake could also be made and served in a traditional 9 inch cake pan in which case you would not remove it from the pan.


That's such a pretty looking cake. I love chocolate and raspberry. I'll definitely give it a try.
This icebox cake looks amazing and those dried raspberries sound delicious! This is a must-do for Valentine's Day!
Wow! This is so good! WIll make this again for Valentine's day. Thank you for the wonderful recipe!
Whay a gorgeous looking icebox cake this is. Pinned this. I would love to give it a try.
What a beautiful and delicious cake to make. Perfect for a birthday or Valentines day!